
MIDI & Pedalboards - What You Need to Know
The Fundamental of MIDI & Pedalboards
This article is a duplicate of the free chapter of our eBook Tones & Technology: Mastering MIDI Controlled Pedalboards. If you like this content and want to learn more advanced techniques for controlling your pedals with MIDI, check out the rest of the book at tonesandtechnology.com
Understanding MIDI Technology
Chapter 2 explores MIDI (Musical Instrument Digital Interface), a communication language for electronic instruments and devices. We'll delve into its history, technical aspects like message structure and channels, and various applications in music creation and effects pedal control. You'll learn about different connection methods like USB and Bluetooth, MIDI mapping for precise pedal control, and practical examples to set up your own MIDI system.
1. Intro
MIDI is magical - when it works. It’s not that MIDI is unreliable, but it’s just old enough and just complex enough that it can twist your mind in knots if you don’t know exactly what strange alien language you’re playing with! When used correctly, it’s a tried-and-true protocol used by professionals for forty years.
When you can press one button and you hear a symphony - there’s no feeling like it. There’s nothing stopping you from becoming a master of MIDI. You just need to have a solid grasp on the fundamentals - the rest is just like routing the audio signal on your pedalboard. It’s logical and easy to map out when something’s not right. Let’s get started.
2. History of MIDI
In 1984, the MIDI association was formed. A group of representatives from musical instrument manufacturers to cooperate on a new protocol for controlling instruments. Before this, there were many proprietary systems for achieving a similar thing. 1984 was the end of those proprietary systems. MIDI changed the game.
A few years earlier, Dave Smith from Sequential Circuits and Ikutaro Kakehashi, the president of Roland, started to collaborate on the system we now know as MIDI. On each side of the ocean, they spoke to their colleagues in the industry and collaborated to build a lightweight, fast, and reliable protocol for devices to be controlled by other devices, sync time clocks, and recall presets - all with one or two small cables.
MIDI was very popular because it was universal, and because products were ready to showcase its potential in the very first years of its release. Roland and Sequential had multiple instruments ready to go, and the protocol worked great.
The rest of MIDI’s history is a gradual expansion and improvement of its features for the last 40 years. New connectors, new digital transmission speeds, and new ways to interact with your instrument. MIDI is so great because it’s a collaboration of some of the most innovative companies in digital instrument history. Putting their heads together, rather than competing, brought us one of the most powerful performance tools there is.
3. Fundamentals of MIDI
MIDI is a serial-based protocol. That means a digital signal is sent along a wire with 1s and 0s making up “bits” which make up “bytes” which make up “packets.”
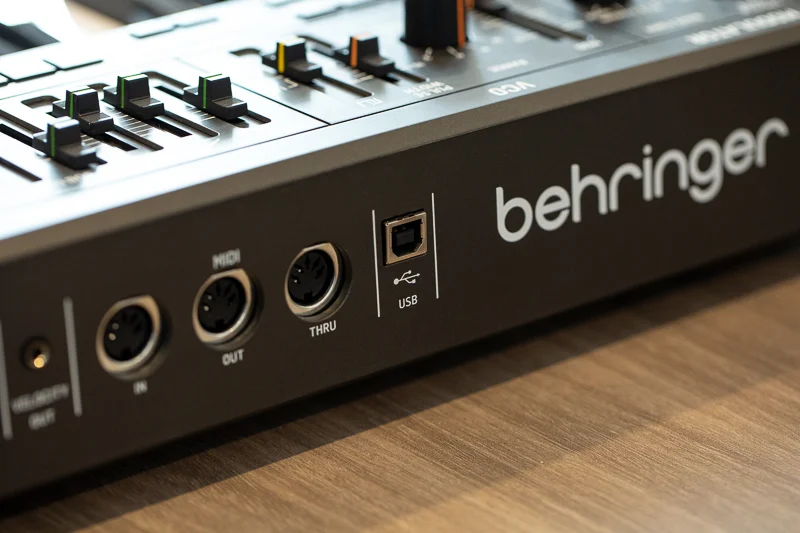
Because it’s a digital signal, MIDI has expanded from the original DIN5 connector to using other connectors such as TRS cables, USB cables, Ethernet cables, and even Bluetooth. It has become very flexible and diverse., But the data inside the messages doesn’t actually change between connection types.
When a MIDI message is sent, it sends a message on a particular channel, targeting a particular control or note, with a value attached that tells the control or note what to do. The sending device has no way of knowing what is physically connected to the other end of the cable though, so the message has to be correct for the receiving device to perform the intended action.
For example, if I have a Strymon BigSky reverb pedal, and I send it a “Note On” MIDI message, it will not do anything. The device that sent the message has no way of knowing that a Strymon BigSky is attached, OR that a Strymon BigSky is not programmed to respond to any “Note On” messages. Likewise, the Strymon hasn’t been programmed to know what a “Note On” is, and therefore it will ignore the MIDI message.
This means that setting up MIDI requires a deeper level of knowledge about all the parts of your MIDI rig than you might expect. You need to know which device is which, how it’s connected, the capabilities and MIDI connectors on each device, and what messages you want to send to each device. That’s why this book needed writing!

Connecting Multiple MIDI Devices
MIDI is directional. One cable carries a MIDI message downstream from one device to the next, and MIDI devices are usually connected in a daisy chain. Many MIDI devices have a MIDI In and a MIDI Out jack. By daisy chaining from the MIDI Out of one device to the MIDI In of the next, you can pass MIDI all the way from your message source, to many devices with only one cable run.
4. MIDI Messages & General Applications
The basic components of any MIDI message are:
▶ Channel
▶ Type
▶ Value
Channel
A MIDI channel may just be the most important, yet most overlooked function of a MIDI message. Channels are like an identity assumed by a MIDI device. Channel are assigned from one to sixteen (1-16).
MIDI channels are used to make devices only listen to specific messages so that you can send similar messages to a different device without other devices also reacting to that message. If a device is set to channel one, it may receive a message on channel four, but it will ignore it.
Without this feature, you would have devices possibly all reacting to the same message, even if it was only intended for one device.
The common error here is that people assume that two devices should be set to the same channel to talk to each other. Because this is not a two-way communication, this is not the case. Channels are used to identify which device is which, not to connect devices.

Type
MIDI messages have many types - used for different functions depending on the manufacturer.
By definition of the MIDI Association, the current types of MIDI messages are as follows (ordered roughly from most common to least common)
Channel Voice Messages:
▶ “Note On” & “Note Off” messages (usually for triggering instruments remotely via MIDI)
▶ PC or Program Changes (Sometimes referred to as Preset Changes)
▶ CC or Control Changes (Sometimes referred to as Continuous Controller)
▶ Pitch Bend
▶ Channel Pressure
▶ Polyphonic Key Pressure
System Messages:
▶ Timing Clock (Sometimes referred to as MIDI Clock - used for synchronising tempos across devices)
▶ Start (for MIDI Clock)
▶ Stop (for MIDI Clock)
▶ Continue (for MIDI Clock)
▶ Active Sensing
▶ System Reset
▶ SysEx or System Exclusive (custom - usually proprietary - data sent via the MIDI system)
The most-used messages are Note On/Off, PC, CC, and Timing Clock. If you want to get a basic MIDI pedalboard up and running, you’ll need to learn about each of these types. In later chapter chapters, we will focus almost entirely on these messages.
Each message type has a range of numbers from zero to 127. So for each type, there are 128 possible controls. (128 notes, 128 preset, 128 virtual controls etc.)
System Messages do not have the same structure as channel voice messages. There is no value, and they often act very differently. For example, the MIDI Clock is a constant stream of messages (16 per quarter note!) which runs and maintains the tempo regardless of whether the target device is active or not. The Clock’s associated start/stop messages will usually be the trigger for the device to play or not, but the timing messages continue so that the devices are always synchronized and don’t drift apart.
Value
The value of each message is also zero to 127. The message type determines what the value will affect. Some message, like PC, do not use a value. Recalling a Preset by number does not require a secondary value.
However most messages make full use of the second value. For example, a physical knob on an effects pedal might also have that control linked to a CC (control change) message. The values of 0 to 127 give us the ability to virtually “turn” that knob by sending the controller number (specific knob) and the value (specific knob position).
Most manufacturers will use the full 0-127 range for best resolution, but some will use 0-100 for percentage-based controls, or even a more limited range if it makes sense for that control. These will be outlined in the “MIDI Implementation” section of the device’s user manual.
When using MIDI notes, the value is usually called “velocity” because the value indicates the strength the note is supposed to have. In the example of triggering a drum machine via MIDI, a value/velocity of 0 would trigger the target drum sample, but 0 would mean the volume would be off. If the value was 1, the sample would be barely audible, and at 127, it would be at its loudest possible level.
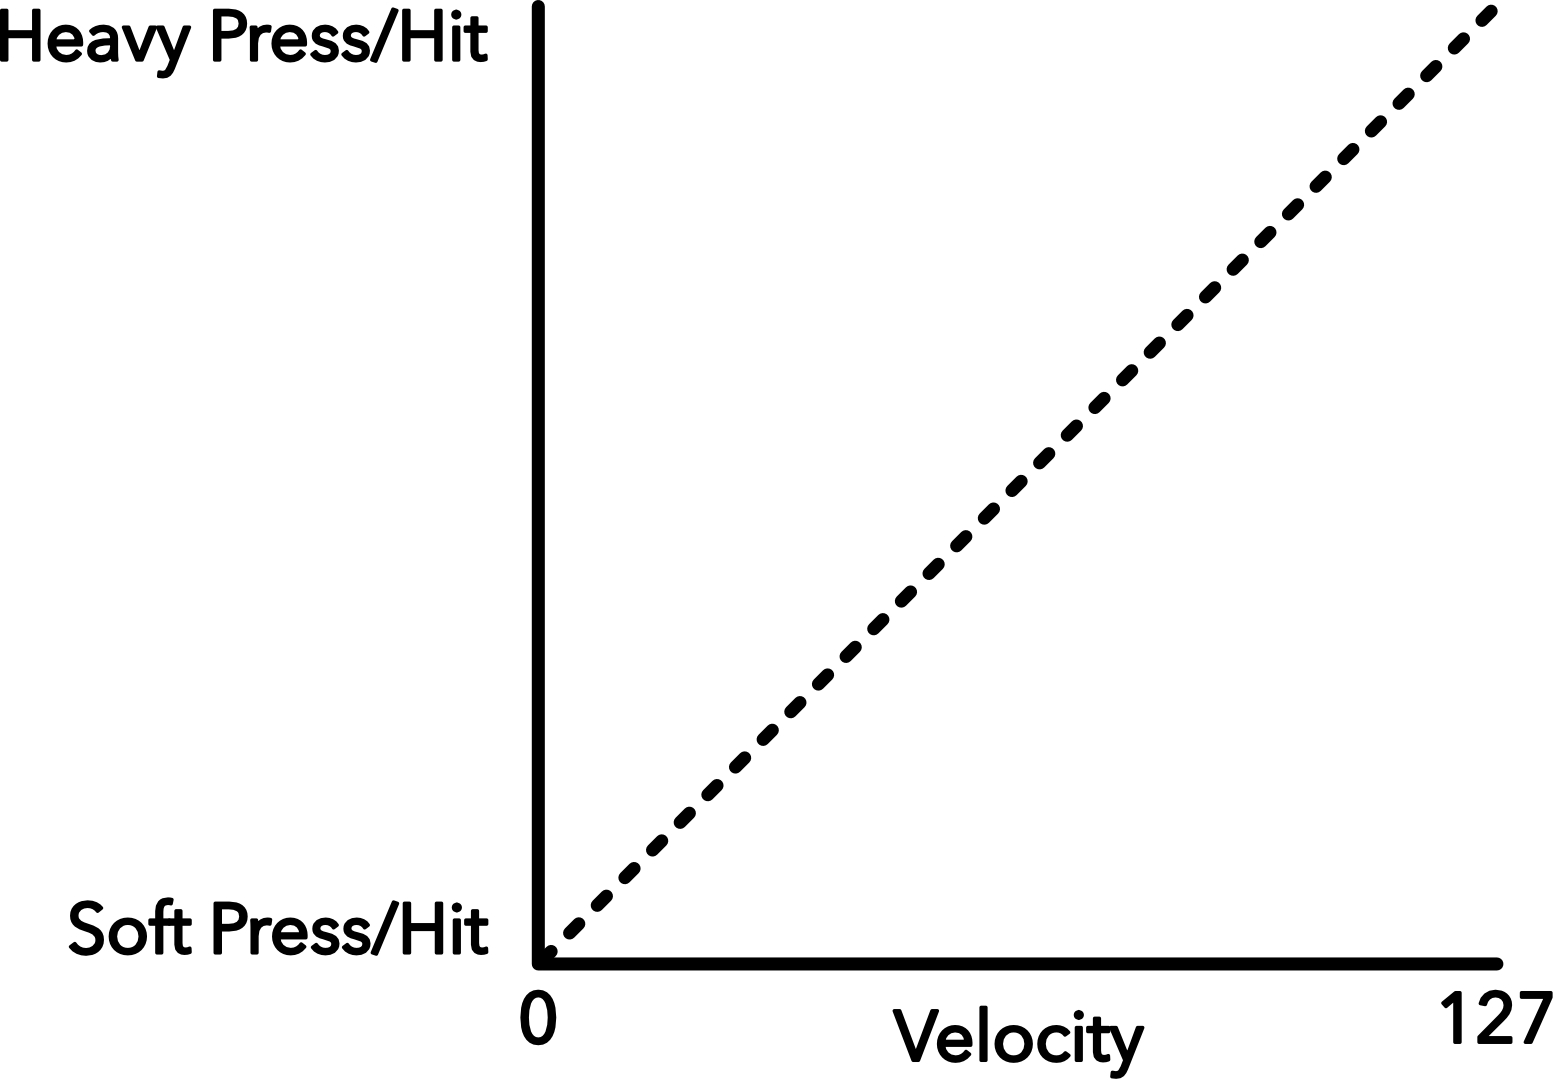
If the drum machine is more complex, it might have multiple samples per drum - a few soft samples and a few loud/hard samples. If the velocity is high, it will play the appropriate loud/hard sample for that velocity range and adjust the volume to suit. A single drum (single Note message) can then have 128 different levels of dynamics available to be played.
5. MIDI Connectivity & Transports
MIDI’s official transports (ways to move messages) include
▶ DIN5 cables
▶ 2.5mm TRS cables
▶ 3.5mm TRS cables
▶ 6.35mm (1/4”) TRS cables
▶ USB
▶ Ethernet
▶ Bluetooth
No matter which transport you are using, the messages themselves are consistent and are carrying exactly the same data. It’s just a matter of convenience or requirements as to which transports you choose to use.
Firewire is also an official transport, but is now an obsolete connector and was never used with guitar effects pedals.
Serial Cables
DIN5 is a solid, reliable connector but it takes up a lot of space in the device and smaller devices tend to prefer a smaller connector. The cables are also becoming harder to find in a pinch. Big music retailers will have them, but a smaller retailer will probably have a very small range.
2.5mm and 3.5mm TRS are excellent for space-saving, but are fragile if left in exposed places. 3.5mm is stronger than 2.5mm, but a good foot stomp or heavy drop is going to cause problems - likely more for the cable than the jack itself. And thankfully 3.5mm TRS cables are abundant in even tech retail stores and gas stations so there’s no worry of being left stranded is a cable fails on the road.
6.35mm TRS (1/4”) is solid, takes less space than a DIN5, and is a great option. Many effects pedal manufacturers have started to use 6.35mm TRS for their MIDI because they’re already using TRS jacks for audio anyway. It’s another cable with many options in retail stores.
If you need to adapt to/from any of the above connectors, it’s entirely doable either DIY, or with cables from manufacturers and boutique online stores. Because it’s just 3 wires (even on the DIN5 plug), it’s simply a matter of having the right wires connected. For DIN5 to TRS, the MIDI Association released this wiring guide.
TRS Types
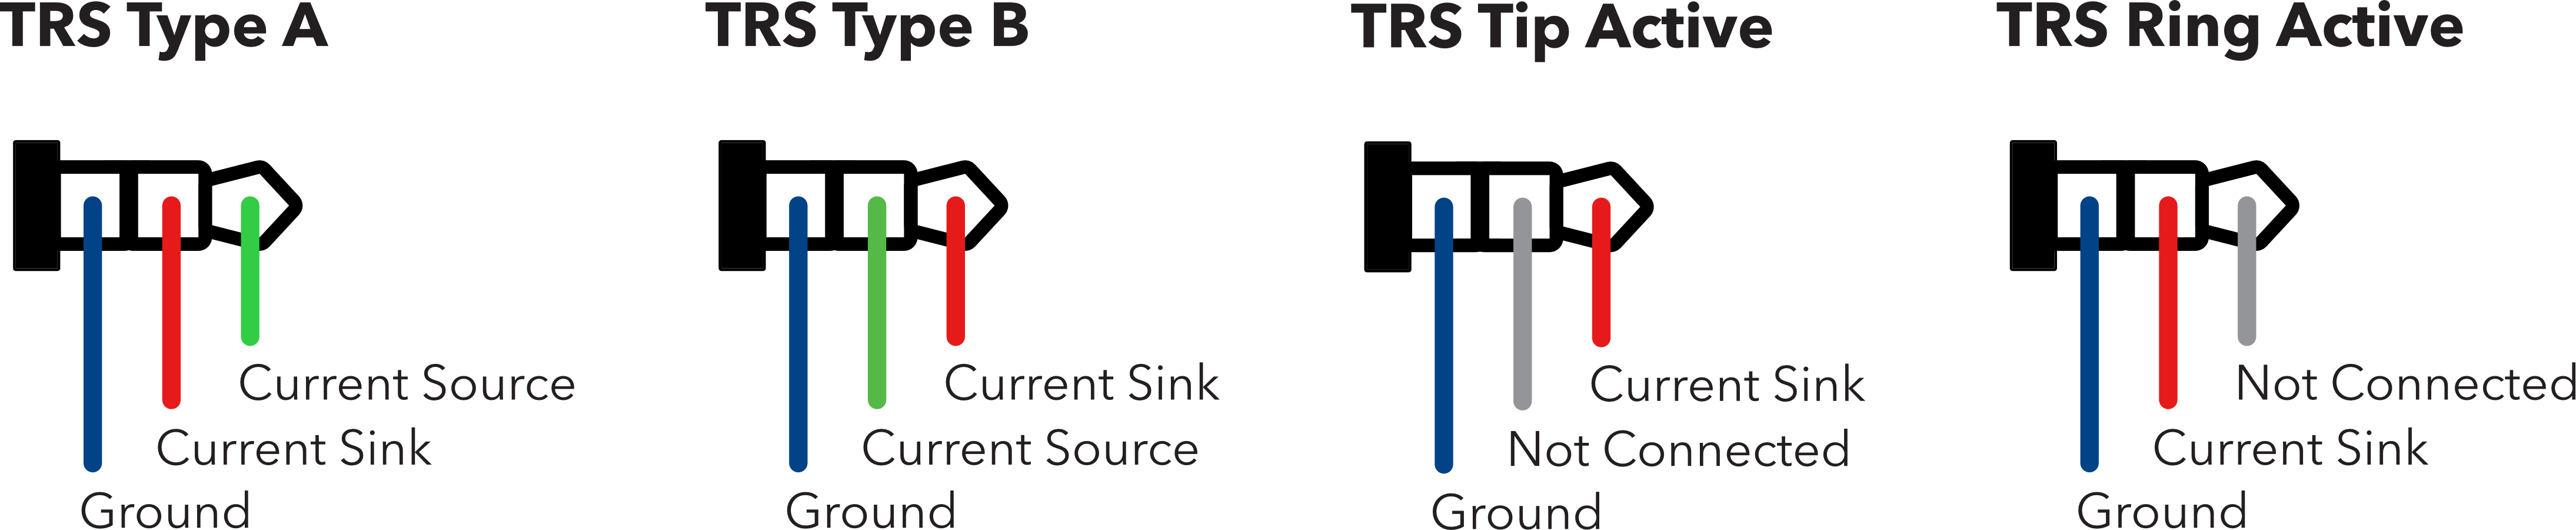
TRS MIDI jacks - usually in 1/4” (6.35mm) size - have different wiring configurations depending on the manufacturer of the pedal. “Type A” is the standard adopted by the MIDI Association, but unfortunately they were too late, and other manufacturers had already adopted “Type B” or even “Tip Active” and “Ring Active” wiring due to the lack of a standard by the MIDI association when these connectors were first being used.
These four types are used within guitar pedals and synths, but USB audio interfaces with MIDI and dedicated MIDI interfaces will always be Type A.
Below you will find a diagram with the different wiring for all four types of TRS MIDI connectors.
Digital Cables
USB has faster message transfer speeds and lower latency, but it’s worth noting a particular limitation with USB MIDI jacks. USB itself requires a Host Device to recognise, manage, and run peripheral USB devices. This includes all USB MIDI devices.
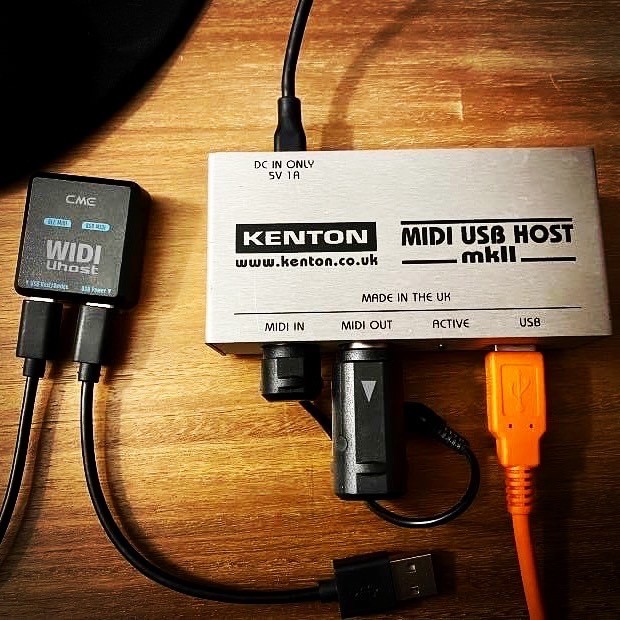
If you have an effects pedal like the Zoom multistomp series which has no Serial MIDI connector but has a USB connector, you will not be able to connect that USB jack to the USB jack on a MIDI controller or another MIDI pedal. Unless, that is, the device specifically advertises USB Host capability (very rare and is a major feature that will be well-advertised).
Host devices that will enable MIDI for such a pedal are:
▶ Any computer-type device with a USB port (Phones, Tablets, Laptops, PC’s
▶ USB MIDI Host boxes
▶ MIDI Controllers with advertised USB Host jacks
▶ MIDI Interfaces with advertised or labelled USB Host jacks
Ethernet is the other digital cable that can be used as a MIDI transport. Some MIDI interfaces (e.g. iConnectivity) have ethernet ports that are designed to work as a MIDI transport. Ethernet is great
because cable runs can be very long (sometimes up to 100m). Ethernet cables are also super common at tech retailers so they’re easy to replace on the road.
Wireless MIDI
Bluetooth, as you might know, is pretty terrible for audio because it has such a low bandwidth and latency that heavy compression needs to be used. Thankfully MIDI is such a data-light protocol that Bluetooth is ideal. Bluetooth MIDI devices created by the like of CME-Pro have brought wireless MIDI reliability & latency to the point where many musicians can use them in a live performance environment with great success.
Of course, Bluetooth is always susceptible to potential interference which could cause problems in a live performance environment, so it’s best to test extensively before committing to using Bluetooth MIDI live. However, the convenience of freedom it gives is undeniable.
CME has a range of Bluetooth devices for MIDI Thru hubs, DIN5 dongles, TRS dongles, and even USB MIDI Host. This can significantly tidy up your rig by removing cables and having only wireless MIDI connections.
6. Pedals & General MIDI Mapping Structures
Since guitar effects processors started getting MIDI control in the 90s, MIDI control has been a major factor in their usability as part of a complex, flexible system. Now we’ll drill down from general MIDI knowledge into specifically effects pedal information.
In general, most MIDI-enabled pedals will have PC (Program Change) messages enabled to recall presets on the device. Sometimes using MIDI will unlock more preset slots than available without MIDI, and sometimes not. Some pedals will have the same 3 presets, just able to be recalled with MIDI PC messages 0-2, and some will have the full complement of 0-127 available.
In the same way, most pedals with MIDI will have a command assigned to bypass or engage the effect. Just like pressing the footswitch on the pedal itself, this message will turn the effect on and off.
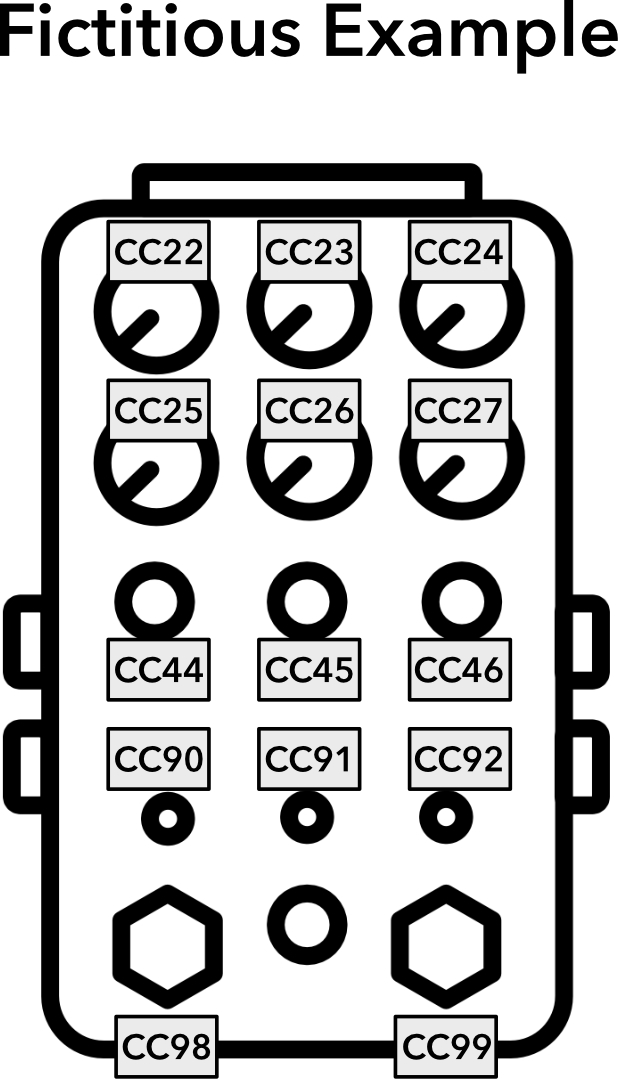
Then there’s the knobs and switches on the pedal. If the pedal has an extended MIDI implementation, at least some if not all the knobs and switches will have a MIDI CC or MIDI Note assigned to them, and the value of that CC or Note number will set the knob or switch to a particular position. For most knobs, value 0 will be full anti-clockwise, 64 will be 12 o’clock, and 127 will be full clockwise turn.
As mentioned earlier, to find the specific MIDI commands for your device, you’ll need to find the MIDI section - usually called “MIDI Implementation” at the back of the device’s user manual. Some brands will have a separate PDF download with the MIDI commands listed in a table.
If a pedal has an expression jack and MIDI capability, usually this feature can also be controlled using a MIDI CC, where value 0 will be heel-down and 127 will be toe-down.
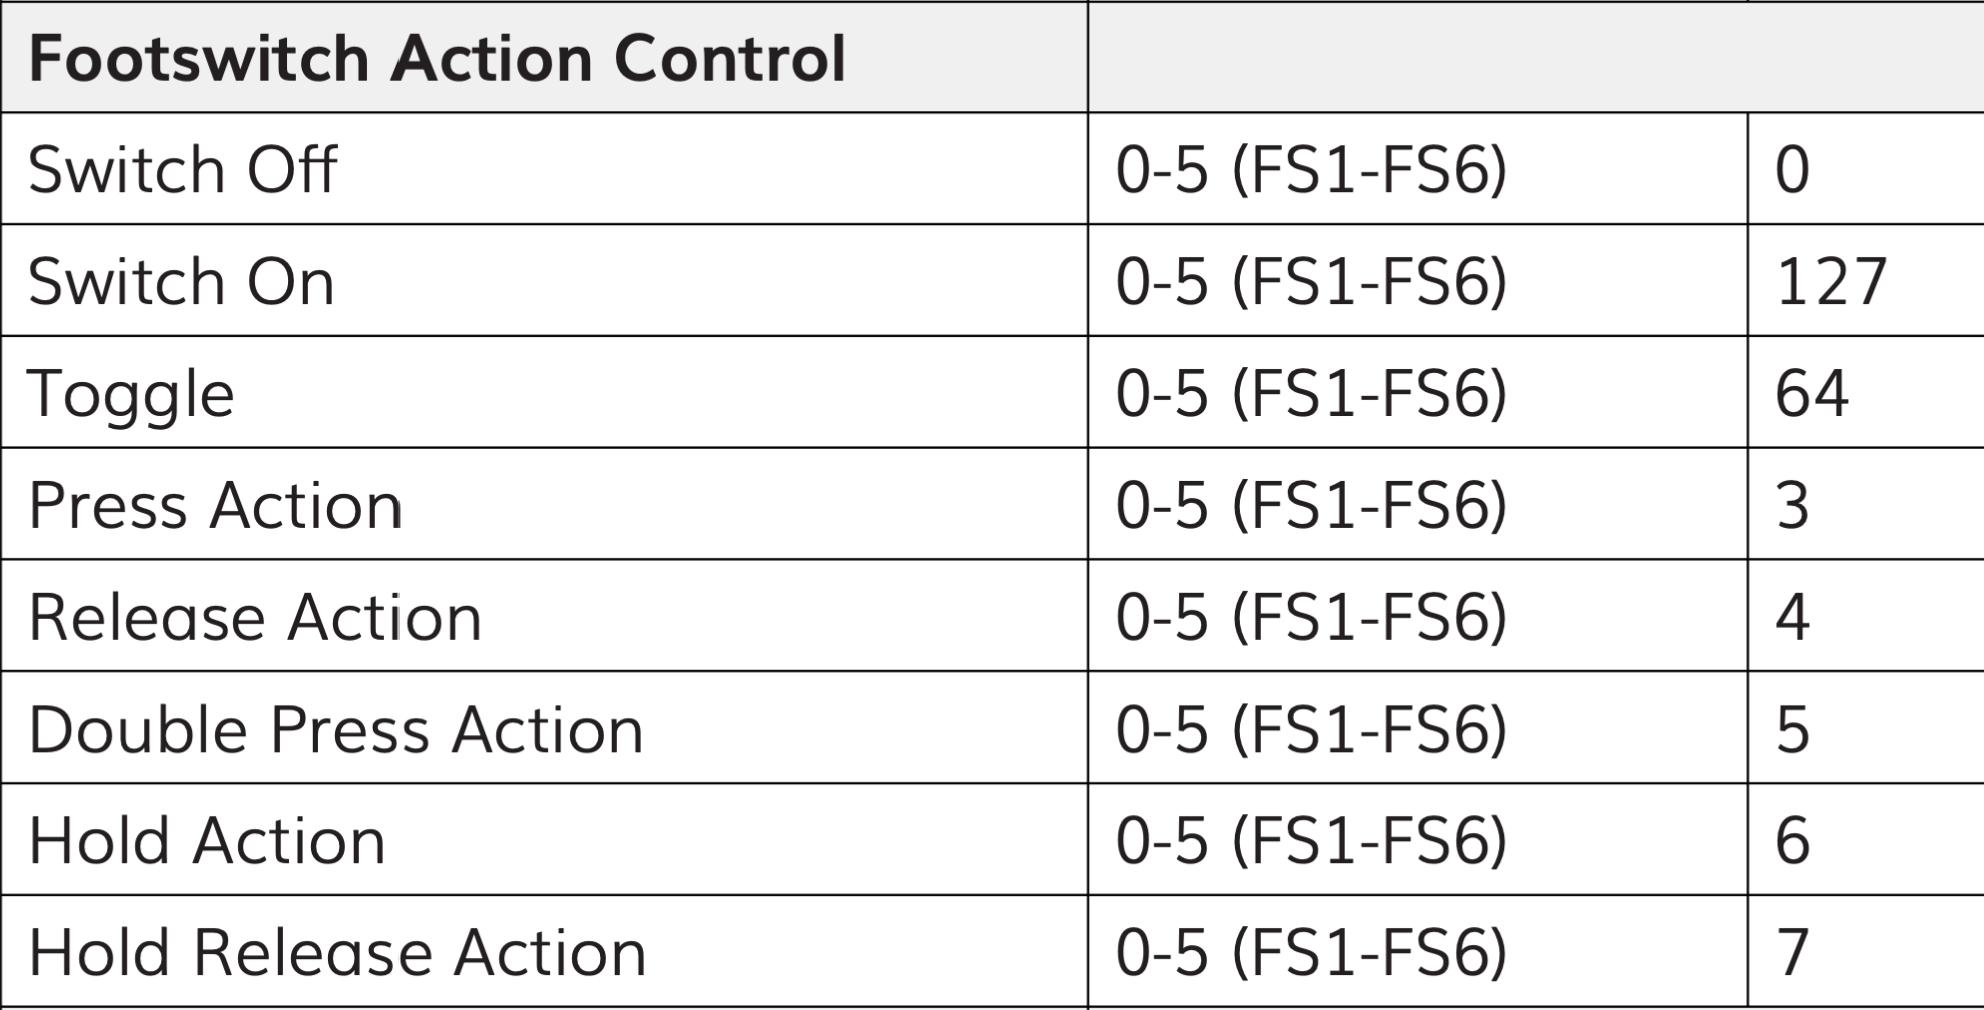
If footswitches on the pedal have different functions depending on whether the switch is pressed, held, double-tapped etc, then usually in the MIDI implementation there will be a single MIDI CC number assigned to the switch, and different values for that CC will determine which press-type is activated.
If you have plenty of MIDI pedals and you haven’t used their MIDI features before, this may all seem a but overwhelming. In that case, start with one pedal, get to know it and its MIDI controls rather than trying to grasp every pedal at once. Manufacturers often have slightly different philosophies on how they add MIDI commands, so trying to learn multiple different pedals at once may overwhelm and confuse you very quickly.
PIRATE MIDI’s MIDI devices come with full access to the Device Library, which is a hand-typed database of over 25,000 MIDI commands from the MIDI implementation section of user manuals. Rather than look up that PDF every time, you can add those messages for your devices directly to your PIRATE MIDI controller when editing using the web editor. It saves loads of time and instead of remembering numbers, you’re looking at the actual label for what that commands does.
Mastering Your Rig
At its core, MIDI isn't about complex programming or alien languages. it’s about total creative freedom over your tone. By understanding how channels, message types, and hardware connections interact, you can transform your pedalboard from a scattered collection of boxes into a unified, powerful performance tool. If you're ready to move past the basics and start building complex presets, routing advanced setups, and truly unlocking your gear's hidden potential, grab your copy of Tones & Technology: Mastering MIDI Controlled Pedalboards at tonesandtechnology.com. Your ultimate rig control is only a few MIDI messages away!